The author’s native language is Chinese. This document is translated using AI.
1. Introduction
This article demonstrates remotely monitoring a GPIO status of the development board via a mobile web page and displaying it on the page. Based on RTIO’s observation mode, the mobile page does not need to poll the GPIO status; instead, the status is immediately pushed to the observer when a change occurs.
The model is shown below:
+----------+          +----------------------+
|          |          |       WINDOWS11      |
| ESP32-C6 | ───────► | +------------------+ |
|          |          | |      WSL2        | |
+----------+          | |                  | |
                      | |  RTIO-Container  | |
+----------+          | |  --------------  | |
|          |          | |  HTTP-Server     | |
| Phone    | ───────► | |                  | |
| (WEB)    |          | +------------------+ |
+----------+          +----------------------+
The logical call flow:
+----------+                     +-----------+
|          |          3          |           |
| ESP32-C6 | ◄────────────────── |           |
|          |                     | RTIO      |
+----------+                  ┌► |           |
                              │  |           |
                              │  +-----------+
                              │
+----------+          2       │  +-----------+
|          | ─────────────────┘  |           |
| Phone    |                     |HTTP-Serve |
| (WEB)    | ──────────────────► |           |
+----------+          1          +-----------+
Interaction steps:
- The mobile browser sends an HTTP request to the HTTP server to open the control page.
- The JavaScript code on the page sends a POST request to the RTIO service.
- RTIO forwards the request to the specific device’s URI and returns the result to the mobile device.
If the development environment is Linux (e.g., Ubuntu PC), you can skip the WSL-related settings mentioned below.
2. Hardware and Environment Setup
You can refer to the previous article RTIO-based Remote LED Control - Hardware and Environment Setup for the setup.
Additionally, the server requires the following setup:
- Python 3 environment. On Ubuntu, you can try installing it using the command
apt install python3.
3. Experiment Steps
3.1. Server Deployment
docker run -it --entrypoint ./rtio \
--rm  -p 17017:17017 -p 17917:17917 registry.cn-guangzhou.aliyuncs.com/rtio/rtio:v0.8.0  \
-disable.deviceverify -disable.hubconfiger \
-enable.hub.tls \
-hub.tls.certfile ./certificates/demo_server.crt \
-hub.tls.keyfile ./certificates/demo_server.key \
-log.level info
To expose the service through WSL, you need to configure the firewall and port forwarding to WSL. For reference, see 4.1. WSL Network Configuration.
3.2. Device Compilation
Refer to the previous article RTIO-based Remote LED Control - Device Compilation for the device compilation process.
Note that in the “first step,” you need to change to the remote_observation project.
git clone https://github.com/mkrainbow/rtio-device-sdk-c.git
cd rtio-device-sdk-c/demos-esp32/rtio/remote_observation/
3.3. Start HTTP-Server
Open another terminal, navigate to the remote_observation/client directory, and use Python3’s HTTP module to serve the HTTP service. The directory includes an “index.html” file for the device control page.
cd rtio-device-sdk-c/demos-esp32/rtio/remote_observation/client
python3 -m http.server 18918
3.4. Open Control Interface
Open the phone’s browser and access the host’s 18918 port (HTTP-Server). Upon successful access, the device control interface will be displayed. If you cannot access it, check your firewall and port forwarding settings. You can refer to 4.1. WSL Network Configuration.
For example, if the host’s address is 192.168.1.100, enter the following URL in the browser:
http://192.168.1.100:18918
Once the control page is successfully loaded, you can enable Observation Mode by clicking the button on the screen. Refer to Appendix 3: Showcase.
4. Appendix 1: WSL Configuration
4.1. WSL Network Configuration
First, ensure that the Windows host network is set to “Private” rather than “Public”. If it is set to “Public”, the Windows firewall will restrict local network traffic.
Open Windows Settings, go to the "Network & Internet" page, click on "Properties" at the top, and select "Private Network".
Next, allow the following ports through the firewall for the host service.
- 17017 - RTIO IoT device access port.
- 17917 - RTIO HTTP API port.
- 18918 - HTTP Server port.
Open Windows PowerShell with administrator rights and run the following commands.
netsh advfirewall firewall add rule name="17017 for RTIO" protocol=TCP localport=17017 dir=in action=allow
netsh advfirewall firewall add rule name="17917 for RTIO" protocol=TCP localport=17917 dir=in action=allow
netsh advfirewall firewall add rule name="18918 for RTIO" protocol=TCP localport=18918 dir=in action=allow
If you are testing the network with a ping, by default, the Windows host may have “ICMP Echo” disabled. You can try adding the following rule.
netsh advfirewall firewall add rule name="ICMP for RTIO" protocol=ICMPV4 dir=in action=allow
To check the firewall rules related to RTIO, you can run the following command:
netsh advfirewall firewall show rule name=all | Select-String "RTIO"
Finally, for port forwarding, forward the device’s requests to WSL. (Here, WSL uses the default networking model, but you can also try other modes like Mirrored Mode Networking, in which case you can skip the next steps.)
Obtain the IP address of the target WSL.
> wsl --list --running
Ubuntu-22.04

> wsl -d Ubuntu-22.04  hostname -I
172.22.3.95
In this example, use 172.22.3.95 and run the following commands for port forwarding.
netsh interface portproxy add v4tov4 listenaddress=0.0.0.0 listenport=17017 connectaddress=172.22.3.95 connectport=17017
netsh interface portproxy add v4tov4 listenaddress=0.0.0.0 listenport=17917 connectaddress=172.22.3.95 connectport=17917
netsh interface portproxy add v4tov4 listenaddress=0.0.0.0 listenport=18918 connectaddress=172.22.3.95 connectport=18918
To check the port forwarding configuration, use the following command:
netsh interface portproxy show all
5. Appendix 2: End of Experiment (Optional)
5.1. Restore WSL Network Configuration
Open Windows PowerShell with administrator rights and run the following commands.
To check current port forwarding:
netsh interface portproxy show all
To delete the RTIO-related port forwarding:
netsh interface portproxy delete v4tov4 listenaddress=0.0.0.0 listenport=17017
netsh interface portproxy delete v4tov4 listenaddress=0.0.0.0 listenport=17917
netsh interface portproxy delete v4tov4 listenaddress=0.0.0.0 listenport=18918
To view the firewall rules added for RTIO:
netsh advfirewall firewall show rule name=all | Select-String "RTIO"
To delete the relevant firewall rules:
netsh advfirewall firewall delete rule name="17017 for RTIO"
netsh advfirewall firewall delete rule name="17917 for RTIO"
netsh advfirewall firewall delete rule name="18918 for RTIO"
netsh advfirewall firewall delete rule name="ICMP for RTIO"
5.2. Restore Network Properties
If the network was set to “Public” before the experiment, remember to restore the network property.
Open Windows Settings, go to the "Network & Internet" page, click on "Properties" at the top, and select "Public Network".
6. Appendix 3: Showcase
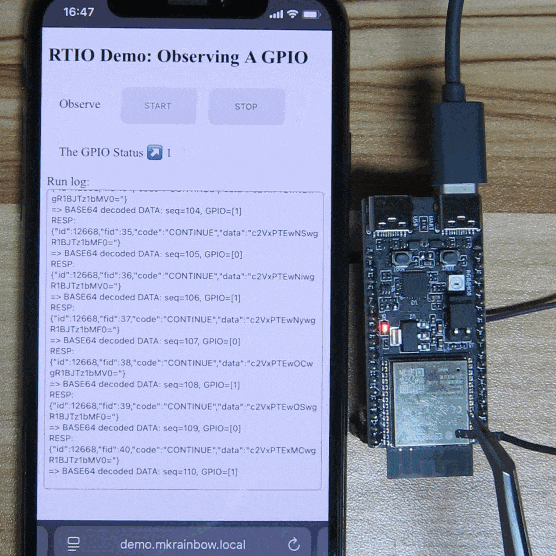
Operation Instructions:
- Click the “START” button to enable Observation Mode.
- The program monitors GPIO10 (located on the ESP32-C6-DevKitC-1 board, pin 10 on connector J1). By default, it is pulled high, and the page displays “The GPIO Status” as “1”.
- When GPIO10 is pulled low (grounded, e.g., touching the shielding), the page updates “The GPIO Status” to “0”.
- Click the “STOP” button to disable Observation Mode.
Conclusion:
Using RTIO Observation Mode, the GPIO state of the development board is instantly updated in real-time without polling from the server or device.